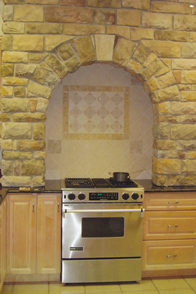
I got the idea from a fellow homeschooling mom’s kitchen. I had to go by her house to pick something up and we walked through her kitchen…I immediately fell in love with her stove area! It’s all stone, with an arch over it. She has a pot filler faucet (confession: I’d never seen one of those before) that I wish I could have had 10 years ago when I fixed spaghetti and macaroni and cheese for 12 people on a regular basis! Her stone is on the darker side as are her cabinets. I would love to share a picture of it here, but don’t feel like I know her well enough to say “ummm, can I take a picture of your kitchen to share on my blog?” So I searched and couldn’t find anything close, but this may give you an idea of the archway, but her stone was on the back and sides of her alcove…

I really want something similar when we do our kitchen upstairs but I’m also trying to find ways to add little touches of what I want while we are still living in our basement. So, I started thinking of a way to come up with the “look”. I started out looking at stone wall paper.
It’s pretty but, for the small amount that I needed for my area, the price was too high. I remembered seeing river rock and even brick scrapbook paper, so the next time I was in Joann’s I decided to have a look. I found this…

…on sale for .20 a sheet so I took a guess and bought 15 sheets. As usual, I didn’t take a proper before picture I got into a big hurry once I got started. I took down the old range hood and moved the stove out. Hubby cut an arch out of luan plywood for me. I started taking pics at this point:
 Please ignore the out dated cabinet color and hardware. They are future projects. :)
I had read how to make homemade Mod Podge on Life in Rehab, and I thought for a project of this size I would try out Sunny’s recipe for Homemade Decoupage Medium. Here are all the ingredients you need: Glue, water and a container to mix it in!
 Glue, water and a container to mix it in!
 Most of the sheets went up whole but I had to cut a few with my paper cutter.
I brushed my glue mixture on the back of the paper and stuck it on the wall, smoothed out the wrinkles (there weren’t many) and then brushed over the top of the paper with more. This is “inside the arch”.
I played cut and paste until I got to the arch. I don’t have a very steady hand when I’m under pressure, and I knew I didn’t have enough paper for any mistakes (the nearest Joann’s is an hour and a half away!). So I put glue on the back of the paper and had my son, who has a very steady hand, cut the paper off along the bottom edge of the arch. Then I coated the outside with more glue mixture. I gave it about four coats.
Here it is while it was drying, back in November.
And here it is today
 If I had it to do over again, I would make sure that I didn’t end up with all my seams right in the middle. But unless you are really looking for it, it’s not the first thing that catches your eye. Please excuse the glare, it’s the basement lighting. I am happy with my “stone work”, especially with the price….$3.00 and a little Elmer’s glue! It will keep me happy ‘til we get our kitchen done upstairs and I can have the real thing! ;-)
 I’ve had a few projects completed since before Thanksgiving and this is one of them. I’m going to be sharing the others and then hopefully keep going with the projects and I try to do a room by room redo of our basement this year.
Have you ever used scrapbook paper for a project that had nothing to do with scrapbooking?

I’ll be sharing my “stone work” at these awesome parties! Click on the button below to see a lot of amazing projects!


That is great!! Love your arch!! I use them in collages and making decorative boxes and houses. And the like! Oh and I covered a hutch back with scrapbooking paper because it would show and I wanted something decorative but easy to put up! Turned out great!
ReplyDeleteHugs
SueAnn
This is pretty cool - SO original!
ReplyDeleteAren't you the clever one! This turned out great! Way to think ouside the box. Thank you for linking up to "AMAZE me Monday" blog party.
ReplyDeleteThat turned out great, Sharon! I love the look. And the price? PERFECT!
ReplyDeleteThanks for the shout out too, very unexpected!
Awesome! A cheap change! Thanks for linking up to Mad Skills Monday!
ReplyDeleteWOW-Scrapbook paper-who would ever imagine that!?!Amazing-I found you on a blog hop and now I'm a follower, so stop by for a visit!-Claire
ReplyDeleteThis is amazing! Oh the possibilities! The seams would worry me the most but they didn't effect the look of yours at all!
ReplyDeleteVery creative! It's amazing what a little Mod Podge can do. :)
ReplyDeleteThat is so darn clever! I never would've thought to do that!
ReplyDeleteSWEET!! Thanks for linkin up with me!! This is perfect, I wanna do one now!!
ReplyDelete~ Nikki
http://bestpartofbelieveis.blogspot.com/
What an original idea. You are so clever!
ReplyDeleteI like it girl, VERY creative!!! I have seen paper tiles before, and they looked awesome, so this makes sense to me. My only worry would be cleaning it, does it hold up so far??
ReplyDeleteTHANK YOU so much for finding my party **Amaze me August** and linking up. I hope you add me to your weekly rounds, and come back next week.
Don't forget to enter my giveaway!!!
Thanks a ton, and what a great blog, I am your newest follower.
Bella :)
wow, this is stunning. i use scrapbook paper to decorate wooden jewelry boxes with mod podge. I love scrapbook paper! I hope that you will link this up with my Show and Share Sunday linky party, going on all week. http://craftygeordi.blogspot.com/2011/01/show-and-share-sunday_23.html
ReplyDeleteWow! That was ingenius! I never would have thought to do that! It looks great! Thanks for sharing at Gettin' Krafty With It and I'm your newest follower!
ReplyDeleteHow cool. My sister and I were oohh and aaahh. I'm impressed
ReplyDeleteWow, I can't believe you did that with scrapbooking paper, it looks SO good! What a fun idea. Love it. Thanks for joining the party!
ReplyDeleteJill
womenwhodoitall.blogspot.com
Too cool!! Scrapbook paper - it isn't just for scrapbooks anymore!!!
ReplyDeleteHugs ~~ Suz
inspiringcreativeness.blogspot
I would have never thought to do that! I am now imagining the possibilities!
ReplyDeleteWow! I wouldn't have thought about scrapbook paper and glue looking like that. How cool! I think it looks great.
ReplyDeleteI would love to have you link this post to my Fix It Up Friday link party.
http://blessingsoverflowing.blogspot.com/2011/01/fix-it-up-friday-baby-shower-decorating.html
Thanks so much for linking and I hope you will add my button to your list.
ReplyDeleteVery cool! I love creative thinking like that!
ReplyDeleteWhat an original idea! Thank you for linking up to Beyond The Picket Fence.
ReplyDeletevery impressive use of scrapbook paper!!! Would love for you to come link up to Handmade Tuesdays @ Ladybug Blessings www.ladybug-blessings.com
ReplyDeleteoh & p.s I have a giveaway going on right now for an inspirational dog print :)
Very creative!! I'm featuring this tonight at MMM!
ReplyDeleteOMG....that is a WINNER!! who would have ever thought about doing that???
ReplyDeleteThanks for the tutorial..I may "steal" that idea from ya!
It's saw some past culture construction. it is really nice looking and fantastic scrap.
ReplyDeleteNeedle Arts