thrift store light globe!!!! I saw this
sitting on a shelf at the thrift store several weeks ago. My first thought was “pumpkin!” but I had to quickly remind myself of my commitment to really being sure of a project before I brought it home. So I stood there and looked at it for a few seconds asking myself “Will I really get this done? How will I use it? and Uh-oh…How will I make the pumpkin stem?” On the stem idea I figured I’d better wait, ‘cause if I couldn’t come up with a fairly easy stem, I knew it would end up upstairs in the “pile”. I confidently walked away knowing I had done the right thing. Then a day or so later, I saw these while I was checking out Dollar Store Crafts.
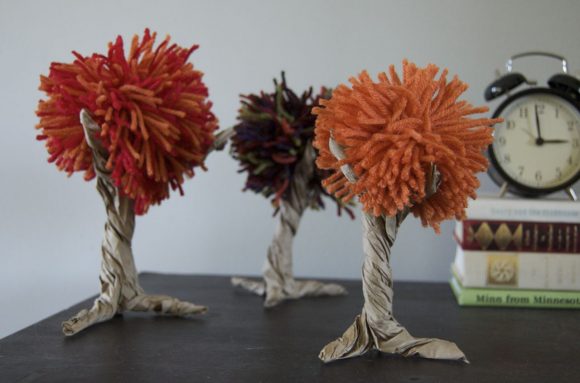
Now I knew how I could make a pumpkin stem! Modge Podge and brown paper! Back to the thrift store I went and there was my light globe patiently waiting for me. A whole Twenty-five cents later, I was on my way to a pumpkin!
I brought it home and gave it a good bath, it had definitely been sitting a while. After it dried, I sprayed it with a light coat of Valspar Plastic Primer. It really gives a nice surface to glass as well as plastic, so the paint can grab on and stay! Since I’m not a big fan of traditional “pumpkin orange” I used Valspar Satin La Fonda Copper. It’s a little deeper orange. One coat did the job!
To make the stem, I cut a small piece of brown kraft paper (a paper bag would also work) and spread some Mod Podge on it.
I folded it and added more Mod Podge until I had it down to about twice the height I wanted for the stem. Then I folded it in half and twisted it. When it looked about right I stuck it to the top of the pumpkin with some Mod Podge for glue.
I gave the stem a final coat all over and set it by the heater to dry. While it was drying, I went looking for something to put it on. These days most pumpkins end up on a pedestal or urn anyway, right? I had a candle holder from Dollar Tree in my closet and it was just the right size for the base.
Next to the holder was an LED tea light and that got me to thinking…How would the pumpkin look with a light inside?
Here it is in the dark:
I love the way the variations in the paint coverage look when it’s lit up! Looks more “natural”!
Here it is in the daylight:
Looks pretty good next to my Welcome Fall tile too:
I think I’m finally on a roll with the fall decorating. Better late than never! Have you made a pumpkin out of something unique or unusual? I’d love to see it! Just leave me a comment with at link!
Have a wonder"fall” week!
Sharing my pumpkin at these fine parties~
Today's Creative Blog
Sunday, October 23, 2011
Saturday, October 22, 2011
So How Hard Can it Be…
To just write a post and stick it out there? No long explanations to catch everyone up on why I haven’t blogged all summer. Is it really necessary to go into all the details or just start posting and share what I’ve got? Hmmmm…??? I’m a “fill you in on all the details kind of gal”, so it IS kind of hard for me. I’ve written many, MANY blog posts in my head over the last months. I’ve even done some projects and remembered to take a few pics! But it’s time for me to get going again, I’ve truly missed blogging, sharing and chatting with all of you. I know if I wait ‘til I have time for all the details and excuses, I’ll never get back at it. How about I just jump in with what I’ve been working on and throw in a few details to catch everyone up along the way?
Alrighty then, here goes! Fall is my favorite time of year! I have always loved decorating for fall, even more than for Christmas. But, like my blog, my seasonal decorating is waaaayyyy behind. I’m actually just getting started for fall. I have been working on several things and can’t wait to share them over the next week. I’m going to start with a fall and Halloween project since Halloween is so close. Some of you may remember my Family Word Art Printable from Valentines Day.
Ever since I have done that project, I’ve wondered what else could be Mod Podged to a tile in the name of “art”? Well, I’ve done many such projects “in my mind” and a couple with my hands. Here is the first one.
I found the artwork at Tea for Two Scraps. There are some great digital scrapbooking freebies there! Many of them would look good on a tile! I chose this one
The colors were also perfect for the print! When you lay your tissue down over the tile, be sure that you have it centered. The tissue doesn’t come up too easily for repositioning…smooth outward as you go. No need to weight the image down, the tissue almost immediately “fades” into the tile!
After it has dried a little, but not too much, I use my fingernail to tear away the edge of the image.This helps add to the appearance that the image is actually painted on the tile.
Let this dry. I sometimes put it in a warm spot to speed this step up! When it’s dry, brush another layer of Mod Podge on the top, brushing in one direction. After this layer dries, you will brush the second coat on in the other direction. As it dries, it will take on a canvas effect! While it the final coat is drying, I spray painted a little stand that I had picked up earlier today at a thrift store.
I had first hoped that the tile would work too, but it had too much gray in it. So I had to use one from a previous thrift store trip! Price was the same…a whopping 25 cents!
I used oil Rubbed Bronze on the stand.
It is the perfect size for the tile and even has leaves on it! Don’t you just love it when a project comes together? You can’t beat a finished project for about a dollar either!
Here are two more images that I think would look great on tile or canvas…if you like spooky stuff! :
Even though I am not “artistic” and can’t draw a straight line or paint, I can get a little creative with Photoshop and I made these! I started with some photos that my 13 year old son had taken. Now, those of you who know me, know that our family doesn’t celebrate Halloween but these pictures got me thinking about my niece, Melissa, who does!
They really were just asking to be made into something “spooky”. I plopped them into Photoshop and went looking for some Halloween images. I found the witch at The Graphics Fairy and the cat and bats via google image search. I had to edit the witch a bit, then I played around with them until I was happy…
So Melissa, these are for you! I hope you aren’t all decorated for your party yet…and I hope you don’t mind me sharing them! If you would like to download them, click on the image and the full size image will open in a new window. Right click again and “save image as…”. I would love to know how you would use them!
Happy to be back at it!
Partying at these fun spots!
Today's Creative Blog
Alrighty then, here goes! Fall is my favorite time of year! I have always loved decorating for fall, even more than for Christmas. But, like my blog, my seasonal decorating is waaaayyyy behind. I’m actually just getting started for fall. I have been working on several things and can’t wait to share them over the next week. I’m going to start with a fall and Halloween project since Halloween is so close. Some of you may remember my Family Word Art Printable from Valentines Day.
Ever since I have done that project, I’ve wondered what else could be Mod Podged to a tile in the name of “art”? Well, I’ve done many such projects “in my mind” and a couple with my hands. Here is the first one.
I found the artwork at Tea for Two Scraps. There are some great digital scrapbooking freebies there! Many of them would look good on a tile! I chose this one
and added “Welcome Fall” to the bottom using Photoshop Elements. Then, I used the tissue paper printing technique that so many folks are using to print for canvases. I printed the image out on tissue paper, using an inkjet printer. In order to get the tissue to go through the printer, you have to first tape it to a piece of cardstock or thick paper.
I’ve also used glue sticks and that works great too! Print it on “general everyday” printing mode so that you don’t saturate the tissue. Oh, you want to print on the NON-shiny side! After printing, remove the tissue from the cardstock and cut out the picture.
Next apply a layer of Mod Podge to your tile. I found a 6x6 at a thrift store that had cut edges. The colors were also perfect for the print! When you lay your tissue down over the tile, be sure that you have it centered. The tissue doesn’t come up too easily for repositioning…smooth outward as you go. No need to weight the image down, the tissue almost immediately “fades” into the tile!
After it has dried a little, but not too much, I use my fingernail to tear away the edge of the image.This helps add to the appearance that the image is actually painted on the tile.
Let this dry. I sometimes put it in a warm spot to speed this step up! When it’s dry, brush another layer of Mod Podge on the top, brushing in one direction. After this layer dries, you will brush the second coat on in the other direction. As it dries, it will take on a canvas effect! While it the final coat is drying, I spray painted a little stand that I had picked up earlier today at a thrift store.
I had first hoped that the tile would work too, but it had too much gray in it. So I had to use one from a previous thrift store trip! Price was the same…a whopping 25 cents!
I used oil Rubbed Bronze on the stand.
It is the perfect size for the tile and even has leaves on it! Don’t you just love it when a project comes together? You can’t beat a finished project for about a dollar either!
Here are two more images that I think would look great on tile or canvas…if you like spooky stuff! :
Even though I am not “artistic” and can’t draw a straight line or paint, I can get a little creative with Photoshop and I made these! I started with some photos that my 13 year old son had taken. Now, those of you who know me, know that our family doesn’t celebrate Halloween but these pictures got me thinking about my niece, Melissa, who does!
They really were just asking to be made into something “spooky”. I plopped them into Photoshop and went looking for some Halloween images. I found the witch at The Graphics Fairy and the cat and bats via google image search. I had to edit the witch a bit, then I played around with them until I was happy…
So Melissa, these are for you! I hope you aren’t all decorated for your party yet…and I hope you don’t mind me sharing them! If you would like to download them, click on the image and the full size image will open in a new window. Right click again and “save image as…”. I would love to know how you would use them!
Happy to be back at it!
Partying at these fun spots!
Today's Creative Blog
Subscribe to:
Posts (Atom)