Showing posts with label Fall. Show all posts

Sunday, September 22, 2013

Happy Fall!! Free Fall Chalkboard Printable

I've thought of all the ways to start of this post, like "It's hard to believe it's been almost two years...", "Where has the time gone?""  I'm sorry..." and I've thought of all the explanations I can give and then I decided to just share what I have for now!

Fall is my favorite time of year! I love all  the sights, smells and sounds and tastes of fall! I'm one who starts thinking about fall in the beginning of August! I've been studying Pinterest and looking for new ways to decorate this year and I've  found a few things that I am excited to try. Chalkboards are still "in" I hope? I like them! Making a chalkboard printable  on the computer is much easier than I thought and fun to make!  I've finished my first fall chalkboard printable today and it's the first day of fall.  I've have wanted to start sharing on my blog again for quite a while and the timing was too good to pass up! So here it is:


It seems that a few things have changed with blogger in the last two years, like clicking on a picture brings up a "gallery" type window? I was afraid this would prevent saving the picture. So, I right clicked on the picture and chose "open in a new window". When the new window opened, I clicked on the image which enlarged it to it's original size. That would be what you want to right click on and save to your computer for printing. If you know of a better way or what I should do to make sharing printables easier, please let me know in the comments. I have more that I would like to share! If you download leave me a comment and let me know how you are decorating for fall.

Whew! Posting after almost two years wasn't as hard as I thought!

Happy Fall!


I'll be sharing my  fall printable here:

            Tips & Tricks Linky Party   House on the Way a hBy Stephanie Lynn

Tuesday, October 19, 2010

Painted Glass Pumpkin

I am still decorating for fall…making progress, slowly but surely. I am not doing a lot of decorating this year and trying to use what I have. I’ve sorted through some things and have a get rid of pile, a use this year pile, and a put up for another year pile. I also have a few things that are in the “undecided” category. I don’t really want to get rid of them, but I’m not sure what to do with them. One of them is a glass canister shaped  like a pumpkin.

100_3007

Although I love apothecaries and glass jars in general, I’ve never bonded with the glass pumpkin. I like it’s shape, but it was just kind of there…blah….So I started thinking about what I could do to dress it up and give it some more personality. The first thing that usually comes to my mind for giving anything a makeover is spray paint! I spray painted the inside of a glass thingy that I used for a knob on my solar light.

114_1592

I really like the glassy “finish” that you get when you paint the inside of something glass. So I decided to try and paint my pumpkin…what color? Why
Pumpkin Orange (by Krylon) of course!

100_3008

I started with a light coat of primer and this time I used a primer for plastic from Valspar and it seemed to work well. It dried quickly and gave  the glass a slightly “rough” surface for the pain to adhere to, but the roughness disappeared once I painted it.

 100_3010

I learned from my son, to spray lightly….so lightly that it seems as though you are hardly getting any paint on and to do many coats! So I did about six or seven.

First Coat:

100_3009

Third Coat:

100_3011

About the Fifth:

100_3021

Done!

100_3027

I couldn’t really get down inside of the edge of the jar, but the lighter color there ended up looking like a natural color variation.  Works for me!

100_3023

I had planned to paint the stem green, but since I couldn’t do it from the inside, I changed my mind. After painting the rest orange, I like the stem clear, picking up hints of the orange in the light.

100_3025

I like it much better after it’s spray paint makeover, so I think I will move it to the “Keep” pile!

Happy Fall…again!

Since my glass pumpkin is all dressed up now, I will find it some places to go….

How about here:

UndertheTableandDreaming

Visit thecsiproject.com 

 DIY Club    


Plus many of the fun linky parties in my sidebar!

Monday, October 4, 2010

A $45 CSN Store Giveaway….and My Fall Wall

Okay, so I was wondering what the problem was….I had announced my giveaway and little linky party so that I could get a peek at some decorated tables and there was very little participation compared to my last CSN giveaway. Had I made it too hard or confusing? I didn’t think so…Then I talked to one of my married daughters who was on her way to pick up,of all things, a console table that she had found through Craigslist. That brought up my giveaway and I told her she needed to enter. To make a long story short, she thought that this giveaway was for a console table…not a gift code like last time! I told her no, that it was a gift card like last time and then wondered how she got that idea anyway. I hung up the phone and quickly went to my blog…OOPS!…nowhere had I mentioned that my giveaway is for a $45 CSN Stores gift code! :(
I hope this post will make it clear…the giveaway is for a
$45 CSN Stores Gift Code to be used at any of their 200 online stores!
****ETA**** The Giveaway is closed***Winner to be announced Monday, October 11, 2010 To enter, please leave me a simple comment,By Clicking HERE do you decorate, or would you decorate a console table if you had one. For a second entry, link up a picture of your table (I love visuals) or one you would love to have (check out some of CSN’s console tables). For a third chance let me know if you are a follower and lastly leave  a 4th comment if you share this giveaway on your blog or Facebook. So you can be entered up to 4 times with 4 separate comments! :-)
Sorry for all the confusion…when I get excited, I forget what I am doing, like forgetting to take “before” pictures when I get started on a project!
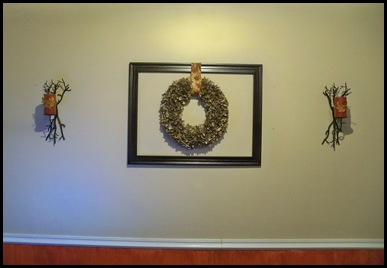
Now, on to my “Fall Wall”! I am amazed at how my tastes have changed since I started blogging! There was a time I thought that I would never have a topiary in my house….but then, I fell in love with this one, and had to make one of my own! Next, I started seeing empty picture frames hanging on walls or standing on shelves, and I thought “what a waste of space”. I should have known better! Slowly, I was drawn to large empty frames at the thrift stores and admiring them hanging on walls or on mantels in blogland until last week I bought one! Then I was inspired by Roeshel’s fabric wreath  and knew what I was going to do!
First, I have a long wall in my “dining area”. We are living in our basement and our living and dining areas are one large “room”. There has been a quilt rack (with one of those awful heart cut-outs in it) hanging there for the whole 10 years we’ve been living here. I’ve been out of love or even like with it for years, but it never occurred to me that I could take it down! Silly huh? 100_2698
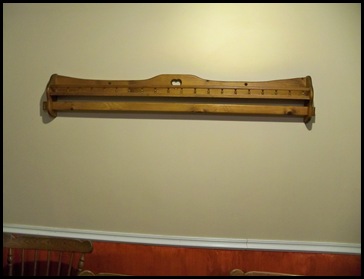
I realized that wall was the perfect place to hang a framed fabric wreath. The  quilt rack came down quickly and easily and I had a fresh space to work with.
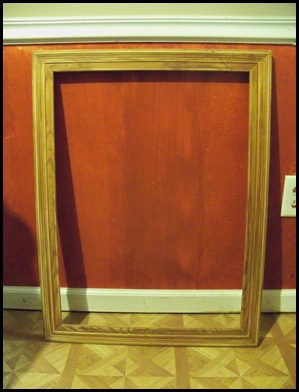
I sanded my .75 frame and gave it several coats of ORB.
100_2696
While it was drying I got started on making a wreath like Roeshel’s

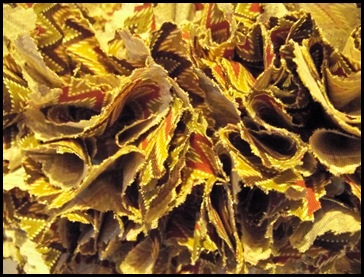
over at The DIY Showoff. Click on the picture above to go to her excellent tutorial! There are a few differences in how are wreaths came together. First, I started using the Gorilla Glue and then changed my mind…that was gonna be a lot of time and glue if I glued each one of those little fabric pieces, so I skipped that step. It is holding together well. Secondly, I had to use 2 yards of fabric to cover my wreath. I don’t know if Roeshel’s fabric was wider (mine is 36”)or if she used less, but her wreath called for one yard. She also found fabric that “looked good on both sides”. If I do this again, I will look for that type of fabric. I was going for the look of fall leaves on the wreath, so I think it is okay, but you do see a lot of the backside of the fabric. I tried putting it in the wreath with both sides in and it didn’t really seem to make a difference. 
100_2708
I didn’t stop to take a bunch of pictures as I went along, so let’s just “skip to the end” (has anyone else watched The Princess Bride enough times to quote most of it? LOL) Here is my Fall fabric wreath hanging in my “empty” picture frame.
100_2783
100_2707
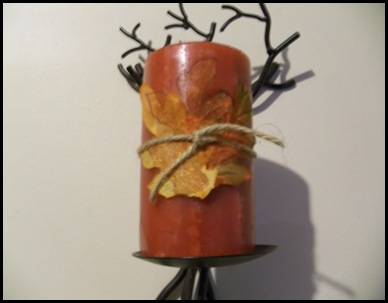
I moved my twig candle holders to either side of the frame and gave the candles a fall makeover by tying leaves around them with twine.
100_2785
100_2710
I’m tickled with my Fall Wall and so glad that quilt rack is finally gone! I have some more fall projects happening too. I’m a little late to catch most of the Fall Festival linkys, but I will be showing this at the weekly parties listed in my sidebar as well as any special events still going on and listed below. Check some of them out for some other fall inspiration!
I found a few Fall themed parties still going on, like the Fall Get-together at It's a Blog Party!
Maryann at Domestically Speaking is having a wreath party! Come check it out!


I'm also sharing this at Today's Creative Blog Get Your Craft On!


And I found a new (well, new to me, Tuesday Party)

Photobucket


Monday, September 27, 2010

My First Fall Meal

After two days of rain, we have clear blue skies and crisp, clean mountain air! Fall is definitely here in the mountains! While it was still raining this morning, soup for supper sounded warm and filling. My family’s favorite is creamy chicken and wild rice. It’s my copy cat of Panera Bread’s soup. I first tried it at Panera  about 2 years ago and couldn’t get enough. It was warm, rich and flavorful…talk about “comfort food”…YUM! I found several recipes online and then played around until I got a close flavor that was fast and easy to make. Here’s my version:

100_2606

Creamy Chicken and Wild Rice Soup

6 cups of chicken broth

1 box of Uncle Ben’s Long Grain and Wild Rice with seasoning packet

2 cups cooked chicken

1 can sliced carrots (drained)

1/2 tsp. salt

1/2 tsp. ground black pepper

1 can cream of celery soup

1 can cream of chicken soup

3/4 cup flour

2 cups milk (I have used half and half, whole milk and 2% milk with success)

In a large pot over medium heat, combine broth, chicken, carrots, salt and pepper. Bring just to boiling, then stir in rice, and seasoning packet. Simmer 10 minutes. Empty cans of soup into a medium size bowl and whisk in the milk a little at a time until smooth. Whisk in flour a little at a time. Stir into broth and rice. Cook over medium heat until heated through and thickened.

Serve with warm bread like Sesame Wheat Braids

or Mrs. Cindy’s French Bread.

MMMMMM….Enjoy!

Sunday, September 26, 2010

Welcome Fall!

Fall is my favorite time of year!! I grew up in South Florida and never really knew a change of seasons. Now I am in the North Georgia mountains and even after twenty years I still look forward to the brilliant colors on the mountains, the smell of oak from first fires in the wood burning stoves and the crisp fall air!
This year a very HOT summer has lasted a little longer than usual by about two weeks. I am so READY for fall!! It has rained most of  today ahead of our first official cool front. We will be in the low 70’s next week after highs in the high 80’s to 90 last week! YAY!
If it’s going to start feeling like fall, I guess it’s time to start making it look like fall. I love fall decorations, the warm rich colors, the spicy scents available in candles…mmmm. Since I am so behind on everything, and easy place to start decorating is the dining room table. I’ve been sitting on this inspiration since last year. I found this  between Thanksgiving and Christmas last year, right after I discovered so many wonderful creative blogs. Here is my inspiration:

photo from Williams Sonoma
I saw this on


and knew right away that I had to make on of my own too!
I found a large vase on clearance at Walmart for $2 and found the pedestal at the thrift store. A little e6000 and I had the beginnings of my WS knock off!
101_2506
I used the bottom of an apothecary jar to hold the candle inside of the vase and dollar store leaves to go in between.
 101_2508 
101_2509
101_2511
 101_2521
I put one of these cuties on either side of the candle. They are one of those amazing Dollar Tree finds! I found the plastic acorns there too.
101_2513
 101_2512
  Well, I’m happy with my fall table, but not the pictures. :-( They will have to do though. I’m camera shopping and until I find the right one, my pictures may leave a little to be desired. I had take one of the whole table but everything seemed to be lost from the distance so we’ll just go with the close ups.
One fall project down and many more to go…
There are some very inspiring Fall link parties happening. Come check them out!

 
Photobucket


I'm also participating in Get Your Craft On over at Today's Creative Blog.

get-your-craft-on

Happy Fall Ya’ll!